
Quick Guidance of Assemble for Apex UV7110
2018-07-23 17:46:29

1. Please put the machine on a smooth ground (indoors) and secure the feet. Recommend to equipped with air conditioner and humidifier to ensure a steady working temperature (The temperature is 20~30℃, the relative humidity is 40~60%).
2. Remove the red fixture from printer-head to ensure the cartridge can move freely.
3. Connet the power, input is 220V, less input like 110V must connect with a 220V adapter.
4. Connect the power cable on the water tank, signal lines and water pipes etc, fill in pure water (Cold and frozen area shall also add some antifreeze liquid) to the green area.
5. Connect the vacuum pump power supply, install the suction tube, silencer and the relief valve.
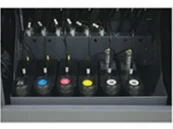
6. Fill in the ink (Please shake the ink bottle before refill), pour the corresponding color into the
specific ink bottles (Each bottle refill about 500ml at the first time).
2. Remove the red fixture from printer-head to ensure the cartridge can move freely.
3. Connet the power, input is 220V, less input like 110V must connect with a 220V adapter.
4. Connect the power cable on the water tank, signal lines and water pipes etc, fill in pure water (Cold and frozen area shall also add some antifreeze liquid) to the green area.
5. Connect the vacuum pump power supply, install the suction tube, silencer and the relief valve.
6. Fill in the ink (Please shake the ink bottle before refill), pour the corresponding color into the
specific ink bottles (Each bottle refill about 500ml at the first time).
7. Open the left side cover of the machine,unscrew the constant temperature bottle cover and refill 1.5L pure water into it (Cold and frozen area shall also add some antifreeze liquid), also add 1L pure water into the white bottle.(Cold and frozen area shall also add some antifreeze liquid).
8. Press the power switch, the ink pump would draw in the secondary ink cartridges. If the ink are not enough,there will be a corresponding number of alarm sound, press the ink reset button (This process probably would repeat 2 to 3 times) until the alarm sound stop.
9. Follow the instructions of the user manual to install Print-Mon drive and connect the machine, install RIP software Photoprint.
10. Remove the front cover of the ink cartridge, set corresponding nozzle voltage and model on Print-Mon according to the guidance of nozzle label.
11. Remove the front cover of the cartridge, unscrew the connector above the filter, open the secondary cartridge valve, press the cleaning button (KCMY Cleaning button and White cleaning button), empty the ink of the secondary cartridge (3-5s one time), if the ink in the bottle is not enough it will alarm. Press the Ink reset button to pump ink into the secondary cartridge, then press the cleaning button again. Repeat the step of every ink cartridge to discharge about 50ml of ink, then the cleaning is finished, and reconnect the ink tube to the filter.
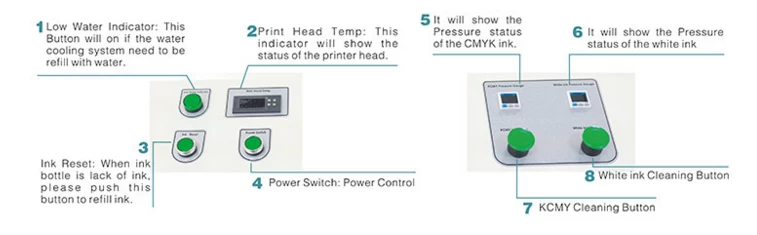
12. After reconnect ink pipe, please firstly remove the protective film on the top of head and then do positive pressure to clean head (3~5s) and use cotton bud soaked with special cleaning liquid to clean the head (please clean the metal plate on two sides of head only, remove the ink drops on the top of head).
13. When the water temperature reach to 42~50℃, make printing test. If the test is good, set the gap (1mm) from printer head, start up position, white ink options and then send out for printing.
13. When the water temperature reach to 42~50℃, make printing test. If the test is good, set the gap (1mm) from printer head, start up position, white ink options and then send out for printing.
If you have any interests, please visit www.apex-jet.com or email apex3@apex-jet.com for more information.