
Trouble Shooting
How to Maintain the printer head
1. If often printing, please do a cleaning and make a nuzzle test everyday to make sure the printer head is in good condition.
2. If less printing, please do cleaning three times every three days and make a nuzzle test to make sure the printer head is in good condition.
3. If not use the machine over 2 weeks, customers should remove the printer head and use the cleaning liquid to clean the print head and pack the printer head well. And stock it in the dark environment.
4. If the nozzle test is bad, please check the trouble shooting in the user manual, or contact local agent for help.
How to maintain the DTG Printer head
1.After each print,move back the printer head to original point andfill moisturizer liquid to cap top to keep head humid once not used in 2 hours.In the next printing, do cleaning and make a printing test to ensure the head status in good condition
2.If not used more than 3 days, wash printer head by using cleaning liquid and inject the moisturizer liquid into printer head to keep it wet
3. If not use the machine over 2 weeks, customers should remove the printer head and use the cleaning liquid to clean the print head, then inject Moisturizer Liquid to the printer head to make it humid. And pack it well and stock it in the dark environment.
4. If the nozzle test is bad, please check the trouble shooting in the user manual, or contact local agent for help.
More Request:
1. Use the good quality ink
2. Please keep the printer head, printer head cable, and all the connections are clean. If they are mixed with ink, please use the cloths or tissue to clean them with 95% alcohol.(Please kindly note: when you do the cleaning of the printer head or cable, please power on the printer.)
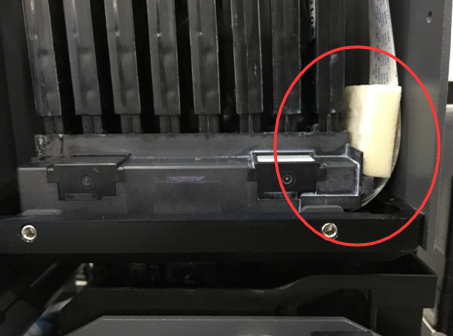
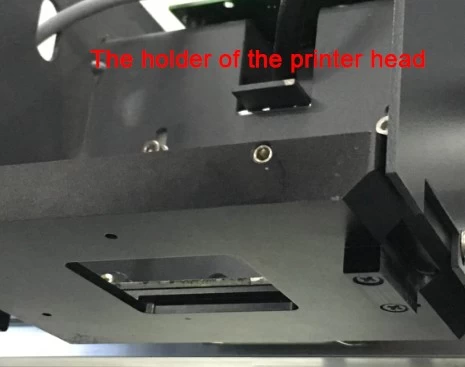
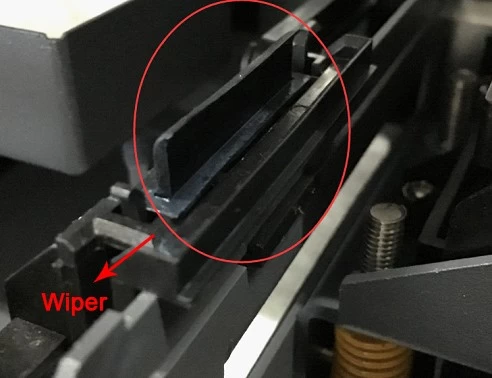
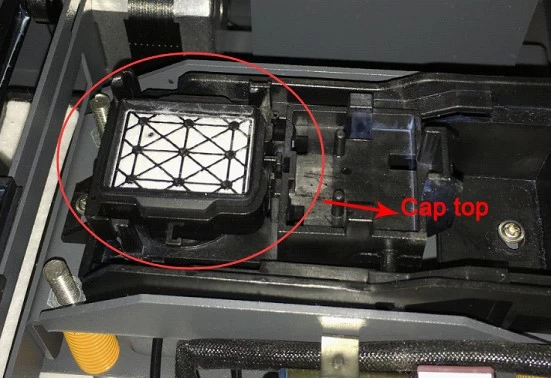
3. Please clean the printer head holder, wiper, cap top regularly as the maintain record form. And please accordingly rise the printer head when you cleaning the holder
.
Video Guide: https://youtu.be/BiUD0emou64
Maintenance
A Continuous use and maintenance requirements
|
Daily Task |
1.Do a cleaning,check the nozzles. 2.Clean up wiper and rubber parts of Cap Top. |
https://www.youtube.com/watch? v=59vLBEtVMLY https://www.youtube.com/watch? v=AVzehgadhKI |
|
Weekly Task |
1.Clean encoder strip. 2..Clean the surface of UV lamp |
https://www.youtube.com/watch? v=O7yFdrJotFo |
|
Monthly Task |
1.Add oil on XYZ slide rail |
https://www.youtube.com/watch? v=21nWwTcqgCY |
|
Seasonly Task |
1.Replace the Cap Top. 2.Replace the wiper. 3.Replace the damper. 4.Clean the UV light. |
https://youtu.be/eovMt0FLpiE https://www.youtube.com/watch? v=nc6BBUzSQFA https://youtu.be/DdeD2NN8ZTw https://www.youtube.com/watch?v=A- 0cFJtlF2s |
|
Year Task |
1.Re place the carriage |
https://www.youtube.com/watch?v=p3rMhb8lQuI |
A Discontinuous use and maintenance requirements
|
With out use in a week |
1. Spray anti-rust oil to rails and wheel(X/Y/Z). |
https://www.youtube.com/watch? v=21nWwTcqgCY |
|
With out use in a month |
1.Clean up ink tubes. 2.Remove printhead wipe it with clean cloth and keep in dark place.
|
https://www.youtube.com/watch? v=OBaa5rW209c
https://www.youtube.com/watch? v=URml5hua-34 |
Consumable parts checking period
|
NO. |
Parts |
SN.on sale |
When |
Checking Period |
|
1 |
Damper |
30160026 |
Broken |
3 months |
|
2 |
Cap Top |
80030065 |
Broken |
3 months |
|
3 |
Wiper |
30160023 |
Too Much Dirty |
3 months |
|
4 |
Waste Ink Pump |
10080011 |
NotWorking |
6 months
|
Q1:The check list for nozzles when test strip not complete

|
Step1: Do a small cleaning, press TEST to check the nozzles. If there is more than10% breakline of a certain color, follow Step2. |
https://www.youtube.com/watch?v=59vLBEtVMLY |
|
Step2: Replace the corresponding damper of the break line color. Do small cleaning, press TEST to print a test strip. Lf still exist the problem, follow Step3. |
https://youtu.be/DdeD2NN8ZTw
https://www.youtube.com/watch?v=59vLBEtVMLY |
|
Step3: Replace Cap Top. Do small cleaning and press TEST to check nozzles. if still exist a problem, contact us. |
https://youtu.be/eovMt0FLpiE
https://www.youtube.com/watch?v=59vLBEtVMLY |
|
Bad test strip type |
Most possible problem parts |
Possibility |
|
One color bad |
bad damper |
50% |
|
several colors bad |
cap top need adjusting |
90% |
|
One color missing |
printheadisclogged |
50% |
|
No ink at all |
cap top need adjusting |
70%
|
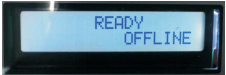
Q2:Display error when send a print job
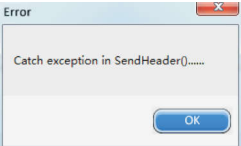
Step1:
Check the control panel if it is as shown at right pic. lf not, press LEFT back to main interface, as right pic. Then resend the print job. lf it is already the right pic do Step2.

Step2:
Reconnect the USB cable, then restart the printer. If still exist a problem, contact us.
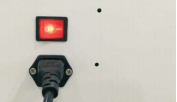
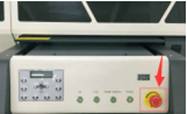
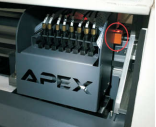
Q3:Printer can not be power on
|
Step1: Check whether the switch in the back of machine is on and the indicator is lighted |
|
|
Step2: Check whether the circuits of scram limit switch is loosen. Besides, the carriage should not be stayed on this switch. |
|
|
Step3: Check whether the red scram button on the front board is open. If there is any problem, please contact us |
|


|
Step1: When the carriage is on the right side, check whether the right side lamp is on. lf not, please contact us. |
|
|
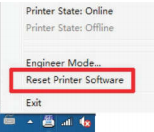
Step2: Restart the computer, pull offand insert in the USB, change the USB port, restartthe driver. |
|
|
Step3: After step2, if the status of the printer is still offline, please re install the driver or contact us. |
https://www.dropbox.com/s/530bxms9vlifqqe/2016.3.5Driver.rar?dl=0 |
Q5 : Bad bi-direction printing quality
1.How to make sure that it is a Bi-direction problem?
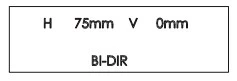
When your printing happen to be with a double shadow like this:
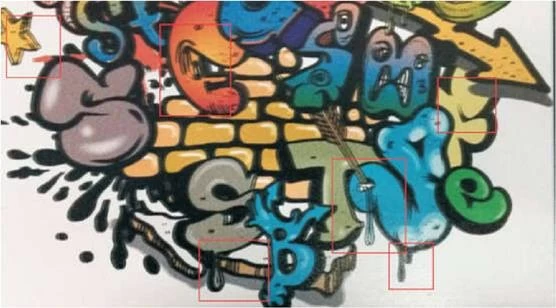
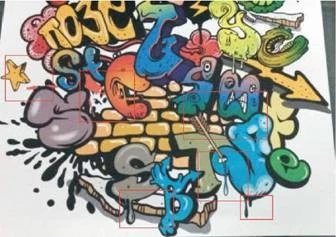
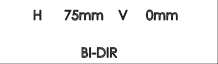
You canchange the mode to Uni-direction. Ifthe problem is gone and the printing is like the following picture, then we are sure it is a bi-direction problem.
The way to change into Uni-direction is like this:
We began form its home page:
The buttons pressing order is:

2. How to solve a Bi-direction problem?
We can change bi-direction quality by changing the numberof “ Bi-direction H Adjust--一”The way to getto“ Bi-direction H Adjust一“ is pressing following buttons.
We Start from the below steps:
The buttons pressing order is:

Then you see the“ Bi-direction H Adjust一“. Generally the first number is“+4“
You can change the number by pressing the following two buttons:

choose a numberthen press“
enter“  Then the number is
Saved.
Then the number is
Saved.
 press
to go back to its home page(oryou can not send a picture to print)
press
to go back to its home page(oryou can not send a picture to print)
Save the numberto be“+4"first. Print a picture in bi-direction mode. Then save the numberto be “+5“ and printthe same picture again beside thefirst picture. Change the numberto be“+4““+5 “+6““+7““+8““+9“ one afteranotherand repeat printing.
Atlast printthe same picture inUni-direction beside those pictures.
Thetotal 7 pictures would belike this:
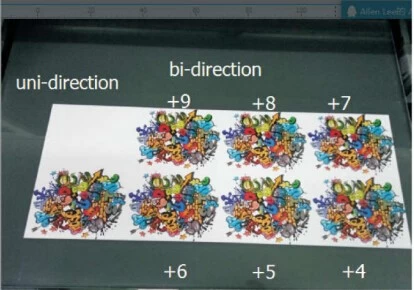
Findtheonefrombi-directionpictures whichlooks mostlike uni-direction and save the number For example, the“+7“looks mostlike uni-direction. Then save“ bi-direction HAdjust“ to be
+7“ and then go backto home page.
3. How to save this number for next downloading.
When you reinstall the driver.this number can be changed.You can remember this number
And change it back.Or you can save the settings for next time downloading.
The way to save the number and all the other settings:

The way to down;oad the number and all the other settings:

When we produced this printer, we had already saved all the right settings. You can download itfirst. Ifit doesn'twork since the number is changed, you can find the number yourself by
the front instructions.